Welcome to Life Sentry Tech Ltd: Empowering Your Health and Well-being.
Discover our diverse range of products and services, from professional medical tools to personal lifestyle enhancements, all designed with you in mind.
About Us:
Building on a Foundation of Empowered Health and Well-being
Life Sentry Tech Ltd is dedicated to developing innovative solutions that empower both healthcare delivery and personal well-being for a more vibrant life. We offer Medpods, essential medical diagnostic kits for healthcare professionals and students, alongside Lyfpods, a diverse range of personal use products supporting lifestyle and specific health needs such as NCD management, maternal care, and promoting relational well-being for couples. To further our commitment, we also provide direct healthcare, ancillary, and expert consultancy services.
Our Distinctive Edge
- Precision-Driven Innovation
- Holistic Healthcare Solutions
- Unwavering Commitment to Excellence
Mission-Driven Purpose
To elevate healthcare outcomes through meticulously crafted products, transformative services, and an enduring commitment to community well-being.
OUR PRODUCTS
Explore Medpods & Lyfpods


Get a Quote
Medpod Gen
Ideal for Specialists, Medical Officers, Clinical Officers & students.
BUY NOWThe Medpod Gen DELUXE features a Littmann Classic Stethoscope available for an additional $90.
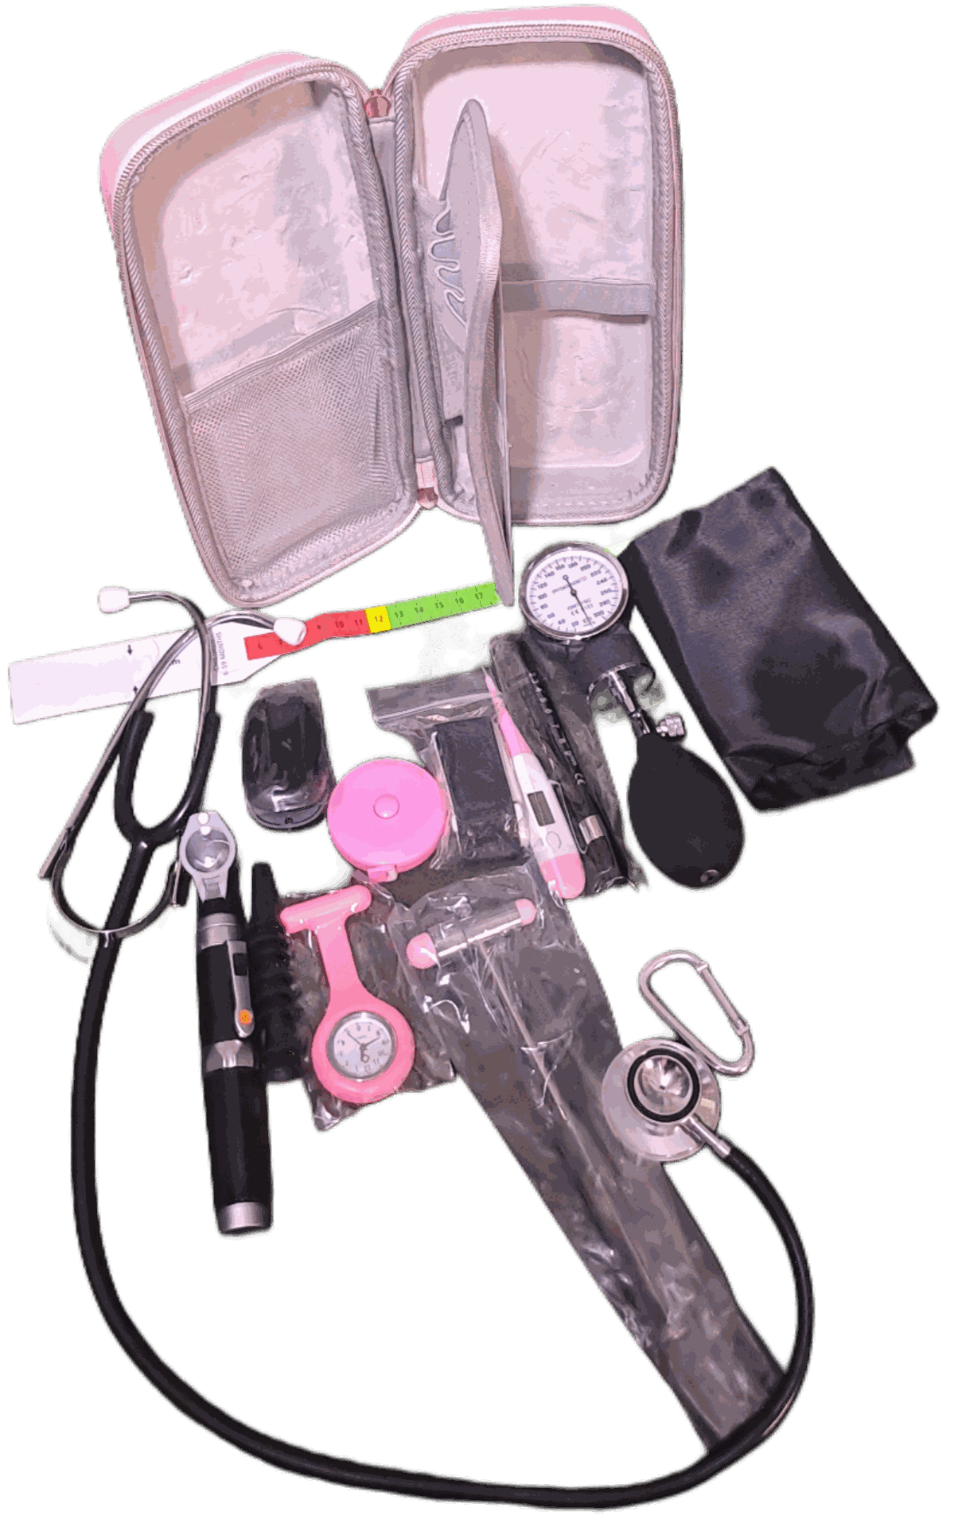
- Premium Case
- Pen light
- Buck Hammer + QST Brush + QST Pin
- MUAC tape
- Otoscope + 8 Cannulas
- Pulse oximeter
- Sphygmomanometer (Aneroid)
- Tape measure
- Digital thermometer
- Tourniquet
Medpod Nurse
Perfect For Nurses, Midwives, & students in training.
BUY NOWThe Medpod Nurse DELUXE features a Littmann Classic Stethoscope available for an additional $90.
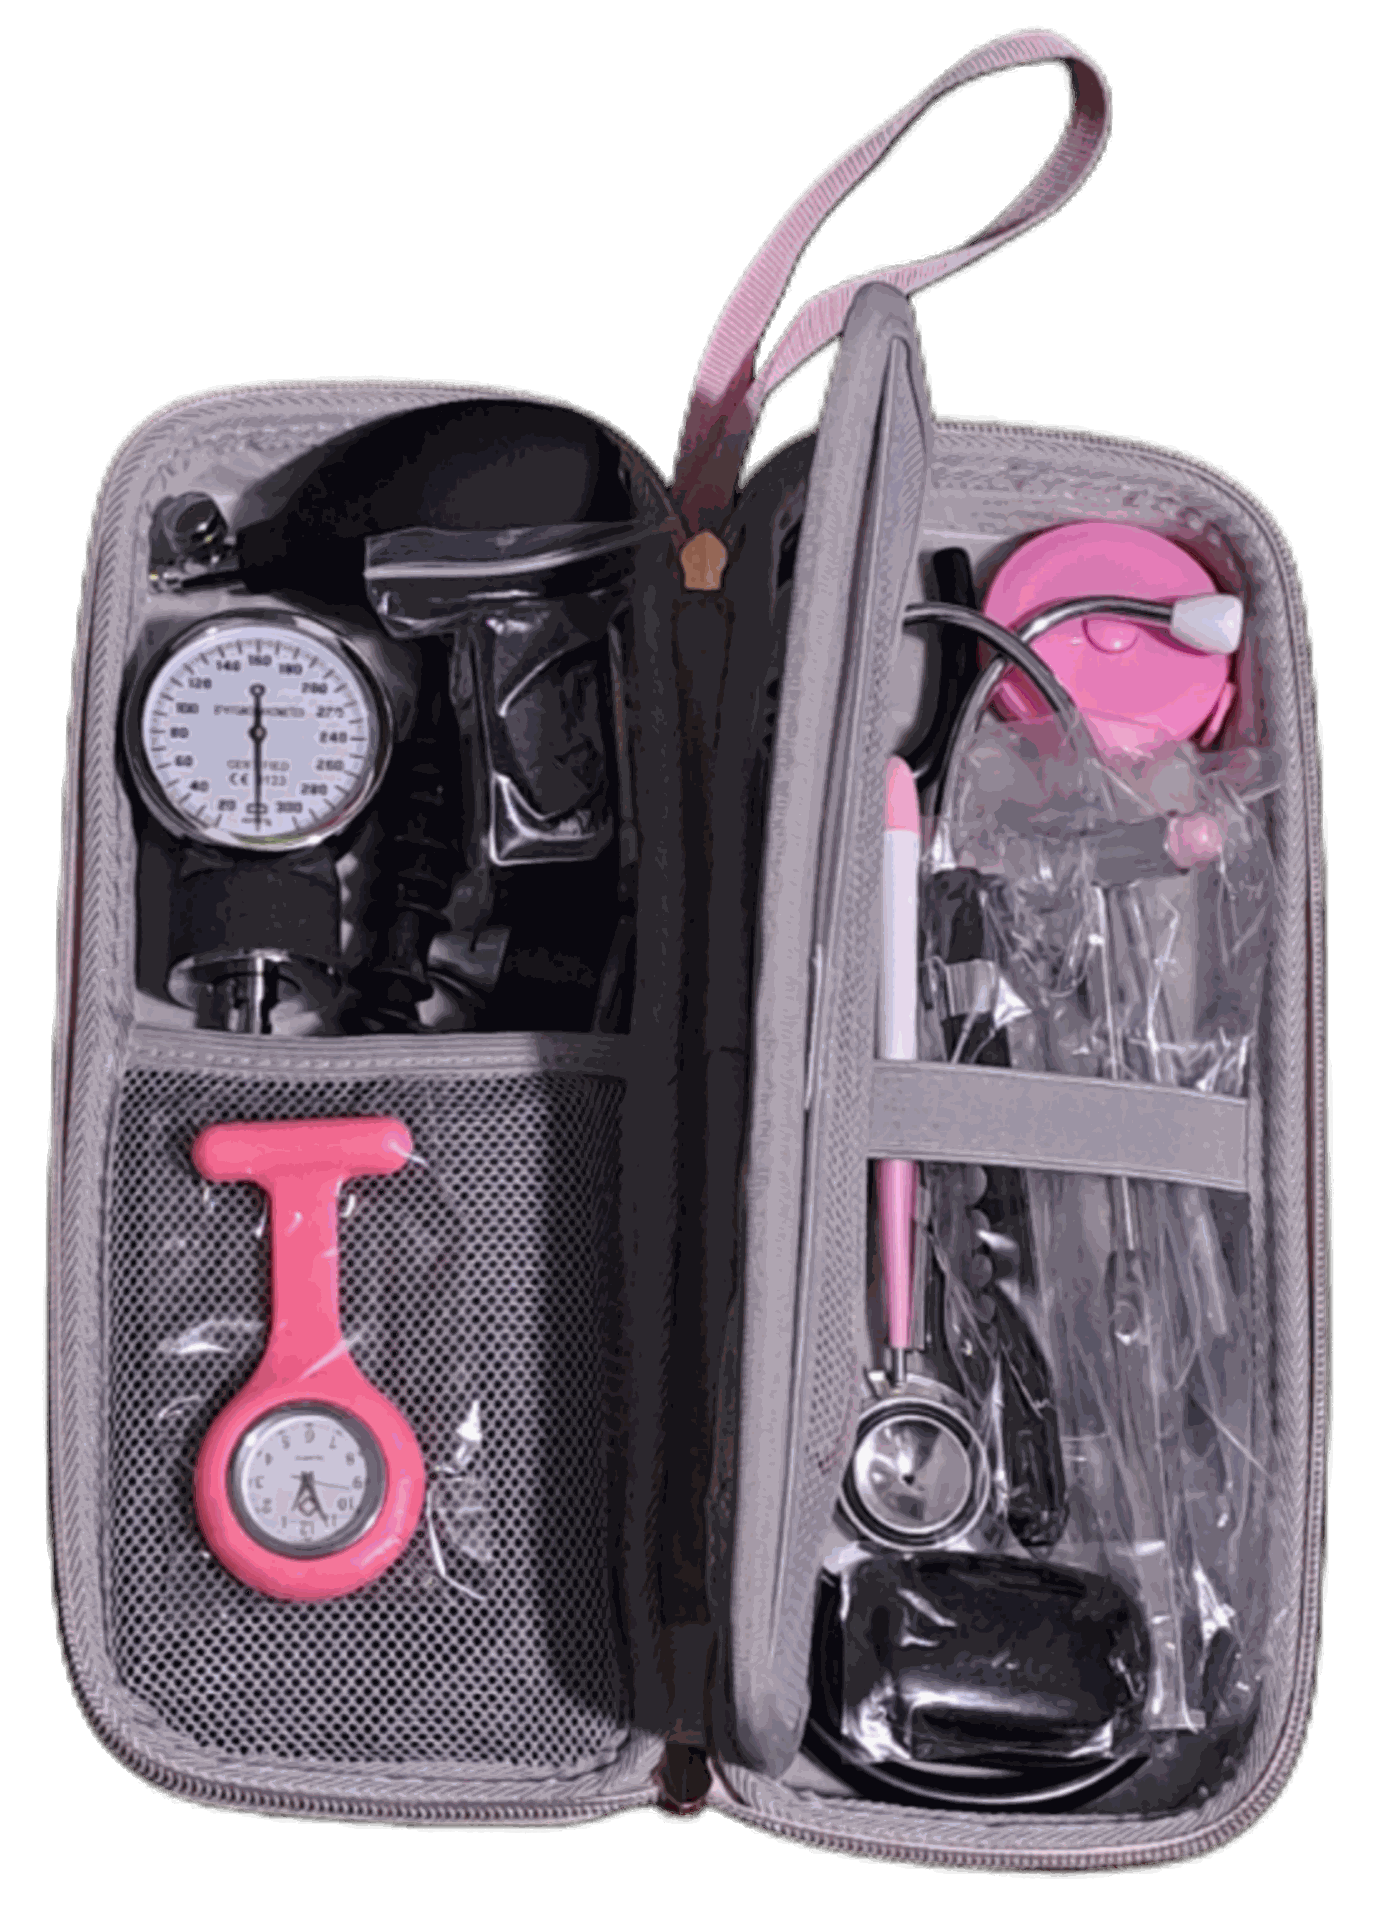
- Premium Case
- Pen light
- MUAC tape
- Otoscope + 8 Cannulas
- Pulse oximeter
- Sphygmomanometer (Aneroid)
- Stethoscope
- Tape measure
- Digital thermometer
- Tourniquet
- Nurse Watch
Medpod Dental Prophy
Coming soon! Stay tuned for our dental innovation.
COMING SOON!Coming Soon!
Medpod ENT
Coming soon! Available soon for ENT specialists & students.
Coming Soon!
![]()
Lyfpod Ma
Still Marinating
Wanna Guess?
Lyfpod Luv
Loading...
Think you might have an Idea?
Lyfpod Care
In the Oven
Try guessing!
OUR SERVICES
Elite Ancillary Services
- Healthcare BPO
- White-Glove Onboarding Experience
- Executive Leadership Development
- Performance Excellence & Accountability Systems
- Strategic Team Building & Elite Networking
- Premium Medical Representation Services
Signature Healthcare
- Executive Home Infusion Healthcare
- Comprehensive Medical Screenings & Educational Programs
- Premium Corporate Wellness Assessments
- Advanced Telehealth Solutions & On-site Medical Facilities
- Personalized Medical Concierge Services
- Accredited Continuing Medical Education (CME)
- Exclusive Provider Networks & VIP Healthcare Events
Strategic Consultancy
- Elite Healthcare Talent Acquisition
- Advanced Clinical Research Solutions
- Curated Medical Tourism Programs
- Strategic Pharmaceutical Marketing
- Global Humanitarian Healthcare Initiatives
User's Guide
💖👩⚕️Let's get Started!🥳👨⚕️
A compact, handheld flashlight frequently utilized in healthcare environments for various assessments.
a). Preparation: Ensure the penlight is functioning properly by checking the battery and turning it on. Make sure the lens is clean for optimal visibility.
b). Patient Interaction: Explain to the patient what you are going to do to ensure they are comfortable and understand the procedure
c). Lighting Conditions:Dim the room lights if necessary to enhance visibility and allow for better observation of the areas being examined
d). Examination
- Pupil Examination
Direct Light Reflex: Shine the penlight into one eye to observe the reaction of the pupil. The pupil should constrict in response to the light.
Consensual Reflex: After examining one eye, shine the light into the other eye to check for a consensual response (the opposite pupil should also constrict)
- Throat Examination: Use the penlight to illuminate the throat while asking the patient to open their mouth and say "ah." This helps visualize the tonsils, uvula, and other structures.
- Ear Examination: If necessary, use the penlight to inspect the outer ear canal and surrounding areas for any abnormalities.
- Skin Examination: Shine the penlight on areas of the skin to assess for lesions, rashes, or other abnormalities.
e). Documentation: Record any findings or observations made during the examination for future reference.
f). Conclusion: Thank the patient and explain any next steps based on the findings from the examination.
Typically used in neurological tests to examine reflexes and sensory responses.
a). Preparation: Ensure the reflex hammer is clean and in good working condition. Familiarize yourself with the different ends of the hammer (the flat end and the pointed end).
b). Patient Positioning: Have the patient sit or lie comfortably, ensuring they are relaxed. This is important for accurate reflex testing.
c). Testing Deep Tendon Reflexes:
Knee Reflex (Patellar Reflex):
- Locate the patellar tendon just below the kneecap.
- Use the flat end of the hammer to strike the tendon gently. Observe for a reflexive kick of the leg.
Ankle Reflex (Achilles Reflex):
- Locate the Achilles tendon at the back of the ankle.
- Strike the tendon with the flat end of the hammer and observe for plantar flexion of the foot.
d). Other Reflexes: Test other reflexes (e.g., biceps, triceps, brachioradialis) using the appropriate technique and observing the responses.
e). QST Pin and Brush:
1.QST pin:
- Light Touch: Gently touch skin with the blunt end.
- Pinprick: Apply slightly more pressure with the sharp end.
QST Brush:
- Light Touch: Stroke skin gently with the soft bristles.
Procedure:
- Baseline: Test an unaffected area.
- Comparison: Test the affected area.
- Evaluation: Changes in sensitivity may indicate nerve damage or other conditions.
e). Documenting Findings: Record the reflex and sensory responses, noting any abnormalities or asymmetries.
Mid-Upper Arm Circumference tape: An instrument employed to gauge mid-upper arm circumference, primarily for the purpose of evaluating nutritional status and detecting malnutrition in both children and adults.
a). Preparation:
- Gather the MUAC tape and ensure it is clean and in good condition.
- Explain the procedure to the patient or caregiver to ensure understanding and cooperation.
b). Positioning: Have the patient (usually a child or pregnant woman) sit or stand comfortably with their arm relaxed at their side.
c). Locating the Measurement Site: Identify the midpoint of the upper arm. This is typically done by measuring from the shoulder to the elbow and finding the halfway point.
d). Applying the MUAC Tape: Wrap the MUAC tape around the midpoint of the upper arm, ensuring it is snug but not too tight. The tape should be level and parallel to the ground.
e). Reading the Measurement: Read the measurement on the tape where it overlaps. Ensure that the measurement is taken at the correct point and is clearly visible.
f). Interpreting the Results: Compare the measurement to established cut-off values for malnutrition. For children aged 6-59 months, a MUAC of less than 11.5 cm typically indicates acute malnutrition.
g). Documenting the Findings: Record the MUAC measurement in the patient’s medical record along with any relevant observations or actions taken.
h). Follow-Up: Based on the results, determine if further assessment or intervention is needed, such as nutritional support or referral to a specialist.
i). Patient Education: If necessary, provide information to the patient or caregiver about the importance of nutrition and any recommended dietary changes or follow-up appointments.
A medical instrument used to examine the ear canal and eardrum.
a). Preparation: Ensure the otoscope is clean and functioning properly. Check the light source and replace the disposable speculum if necessary.
b). Patient Positioning: Have the patient sit comfortably, preferably in a well-lit area. For children, it may be helpful to have a caregiver present to help keep them calm.
c). Inspecting the Ear:
- Choose the Right Speculum: Select an appropriate-sized speculum for the patient's ear canal (larger for adults, smaller for children).
- Hold the Otoscope: Grasp the otoscope like a pen, with your thumb on the switch to turn on the light.
d). Positioning the Ear:
- For adults, gently pull the outer ear (pinna) upward and backward to straighten the ear canal.
- For children, pull the pinna downward and backward.
e). Inserting the Otoscope: Carefully insert the speculum into the ear canal, avoiding any forceful insertion. Keep the otoscope at an angle to prevent discomfort.
f). Examine the Ear Canal and Eardrum: Look through the lens of the otoscope to visualize the ear canal and eardrum. Observe for any abnormalities such as redness, swelling, discharge, or perforation of the eardrum.
g). Document Findings: Record any observations, noting the condition of the ear canal and eardrum, as well as any signs of infection or other issues.
h). Remove the Otoscope: Gently withdraw the otoscope from the ear canal, ensuring not to touch the walls of the canal.
i). Patient Care: Explain your findings to the patient or caregiver and discuss any necessary follow-up or treatment options based on the examination results.
A portable, non-invasive device used to measure the oxygen saturation level (SpO2) in the blood and the pulse rate.
a). Preparation: Ensure the pulse oximeter is clean and functioning properly. Check that the battery is charged and the display is working.
b). Patient Positioning: Have the patient sit or lie comfortably. Ensure their hand is relaxed and at heart level to facilitate accurate readings.
c). Selecting the Finger: Choose typically the index or middle finger. Avoid fingers with nail polish, artificial nails, or any signs of injury.
d). Applying the Pulse Oximeter: Open the clamp of the pulse oximeter and place it over the selected finger, ensuring that the sensor covers the nail bed completely. The device should fit snugly but not too tightly.
e). Waiting for the Reading: Allow a few seconds for the device to obtain a stable reading. The pulse oximeter will display the oxygen saturation level (SpO2) and pulse rate on the screen.
f). Interpreting the Results: A normal SpO2 reading typically ranges from 95% to 100%. Values below 90% may indicate hypoxemia and require further evaluation or intervention.
g). Documenting Findings: Record the SpO2 and pulse rate in the patient’s medical record, along with any relevant observations or symptoms.
h). Removing the Device: Gently remove the pulse oximeter from the patient’s finger after obtaining the readings.
i). Patient Care: Discuss the results with the patient, explaining any necessary follow-up actions based on the findings, especially if the oxygen saturation is low.
Is used to measure blood pressure.
a). Preparation: Ensure the sphygmomanometer is clean and functioning properly. For aneroid devices, check that the gauge is calibrated.
b). Patient Positioning: Have the patient sit comfortably with their arm supported at heart level. Ensure they are relaxed and have not consumed caffeine or smoked in the last 30 minutes.
c). Selecting the Cuff Size: Choose an appropriate cuff size based on the patient’s arm circumference to ensure accurate readings.
d). Applying the Cuff: Wrap the cuff around the upper arm, approximately 1 inch above the elbow, ensuring it is snug but not too tight. The bladder of the cuff should be centered over the brachial artery.
e). Inflating the Cuff: For aneroid devices, use the bulb to inflate the cuff until the gauge reads about 20-30 mmHg above the expected systolic pressure. For digital devices, press the start button to inflate automatically.
f). Measuring Blood Pressure:
- Aneroid: Slowly release the pressure in the cuff by opening the valve, allowing the gauge to drop gradually. Listen with a stethoscope over the brachial artery to identify the first sound (systolic pressure) and the point where the sound disappears (diastolic pressure).
- Digital: The device will automatically measure and display the systolic and diastolic pressures along with the pulse rate.
g). Documenting Findings: Record the blood pressure reading (systolic/diastolic) and pulse rate in the patient’s medical record, along with any relevant observations.
h.) Removing the Cuff: Gently remove the cuff from the patient’s arm after taking the measurement.
i). Patient Care: Discuss the results with the patient, explaining any necessary follow-up actions based on the findings, especially if the blood pressure is elevated or low.
Is used to Auscultate (listen) to internal sounds of a patient’s body, primarily the heart, lungs, and intestines.
a). Preparation: Ensure the stethoscope is clean and in good working condition. Check that the earpieces fit comfortably and the diaphragm or bell is free of debris.
b). Patient Positioning: Have the patient sit or lie comfortably, depending on the examination. Ensure they are relaxed to facilitate accurate auscultation.
c). Choosing the Appropriate Side: Decide whether to use the diaphragm (larger side) for high-frequency sounds (e.g., heart sounds, lung sounds) or the bell (smaller side) for low-frequency sounds (e.g., certain heart murmurs).
d). Placing the Stethoscope:
- Heart Sounds: Place the diaphragm or bell on the left side of the chest, over the area of the heart (typically the 4th to 5th intercostal space at the midclavicular line). Listen for heart sounds, including the rate, rhythm, and any abnormal sounds (e.g., murmurs).
- Lung Sounds: Move to the lung fields, placing the diaphragm on the front and back of the chest, and listen for breath sounds. Compare sounds on both sides for symmetry.
- Bowel Sounds: Place the diaphragm on the abdomen to listen for bowel sounds, assessing their frequency and character.
e). Listening: Allow sufficient time (at least 30 seconds) to listen to each area. Pay attention to the quality of the sounds, noting any abnormalities.
f). Documenting Finding: Record your findings in the patient’s medical record, including heart rate, rhythm, lung sounds, and any abnormal findings.
g). Removing the Stethoscope: Gently lift the stethoscope from the patient’s body after completing the examination.
h). Patient Care: Discuss any findings with the patient, explaining their significance and any necessary follow-up or treatment options based on the auscultation results.
A tape measure is a flexible measuring tool used in medical settings for various purposes, including assessing body dimensions, monitoring growth, and evaluating nutritional status. Here’s a step-by-step description of its medical use:
a). Preparation: Ensure the tape measure is clean and in good condition. If using a cloth or flexible tape measure, check for any damage or wear.
b). Patient Positioning: Have the patient stand or sit comfortably, depending on the measurement being taken. Ensure they are relaxed and in a neutral position.
c). Selecting the Measurement Site: Determine the specific measurement needed (e.g., height, waist circumference, hip circumference, or limb length).
d). Measuring Height: For height, have the patient stand straight against a wall or measuring device. Use a flat object (like a book) to mark the highest point of the head, then measure from the floor to the mark.
e). Measuring Circumference:
- For waist circumference, locate the natural waist (usually just above the navel). Wrap the tape measure around the waist, ensuring it is level and snug but not compressing the skin. Record the measurement.
- For hip circumference, measure around the widest part of the hips and buttocks, ensuring the tape is level and snug.
f). Measuring Limb Length: For limb measurements (e.g., arm or leg length), have the patient stand or lie down. Measure from a specific bony landmark (e.g., shoulder to elbow for arm length) to the desired endpoint.
g). Documenting Findings: Record all measurements in the patient’s medical record, noting the date and any relevant observations.
h). Patient Care: Discuss the significance of the measurements with the patient, especially if they relate to growth, nutritional status, or health assessments.
A digital thermometer is a medical device used to measure body temperature quickly and accurately.
a). Preparation: Ensure the digital thermometer is clean and functioning properly. Check the battery and display.
b). Choosing the Measurement Site: Decide on the appropriate site for temperature measurement: oral, rectal, or axillary (underarm). Each site may yield slightly different readings.
c). Patient Positioning:For oral measurement, have the patient sit comfortably with their mouth closed. For rectal measurement, position the patient appropriately (usually lying on their side). For axillary measurement, have the patient raise their arm.
d) Turning on the Thermometer: Press the power button to turn on the digital thermometer. Wait for the display to indicate it is ready for use (usually a beep or a flashing display).
e). Measuring Temperature:
- Oral: Place the thermometer under the tongue, towards the back of the mouth. Instruct the patient to close their mouth and breathe normally.
- Rectal: Apply a small amount of lubricant to the tip of the thermometer. Gently insert the thermometer about 1 inch into the rectum, holding it in place until it beeps.
- Axillary: Place the thermometer in the center of the armpit, ensuring it is in contact with the skin. Lower the arm to hold the thermometer in place.
f). Waiting for the Reading: Allow the thermometer to measure the temperature. Most digital thermometers will beep when the reading is complete.
g). Reading the Temperature: Check the display for the temperature reading. Note the value and the measurement site used.
h). Documenting Findings: Record the temperature in the patient’s medical record, along with the date, time, and measurement site.
i). Cleaning the Thermometer:After use, clean the thermometer typically with alcohol wipes or soap and water, especially if it was used rectally.
j). Patient Care: Discuss the temperature findings with the patient, explaining any necessary follow-up actions based on the results, especially if the temperature indicates fever or hypothermia.
A tourniquet is a medical device used to control bleeding and facilitate venous access during procedures such as phlebotomy (blood draw).
a). Preparation: Ensure the tourniquet is clean and in good condition. If using a disposable tourniquet, check that it is intact.
b). Patient Positioning: Have the patient sit or lie comfortably with their arm extended and supported. Ensure they are relaxed to facilitate easier venous access.
c). Applying the Tourniquet:
- Locate the Venipuncture Site: Identify the appropriate site for venipuncture, typically the antecubital fossa (the crease of the elbow) or the back of the hand.
- Place the Tourniquet: Wrap the tourniquet around the upper arm, approximately 3-4 inches above the intended venipuncture site. Ensure it is snug but not too tight to cause discomfort.
- Tighten the Tourniquet: Pull the ends of the tourniquet to tighten it until the veins become engorged and more visible. This helps to make the veins easier to access.
e). Assessing the Veins: After applying the tourniquet, assess the veins for size and location. Palpate the area to identify a suitable vein for puncture.
f). Performing the Venipuncture:
- Clean the venipuncture site with an antiseptic wipe and allow it to dry.
- Insert the needle into the vein at a 15-30 degree angle, bevel up, and advance it until you feel a "pop" as the needle enters the vein.
- Once blood flow is established, attach the collection tube or syringe to the needle.
g). Releasing the Tourniquet: Once blood flow is established, release the tourniquet to reduce pressure on the vein. This helps prevent hemoconcentration and allows for a more accurate blood sample.
h). Completing the Procedure:
- After collecting the required blood samples, withdraw the needle and apply pressure to the puncture site with a gauze pad to stop any bleeding.
- Dispose of the needle and any used materials in appropriate sharps containers.
i). Documenting Findings:Record the procedure details, including the site of venipuncture, the number of attempts, and any complications.
j). Patient Care: Provide aftercare instructions to the patient, such as keeping the bandage on for a few hours and monitoring for any signs of excessive bleeding or bruising.
The portable, carry-on premium case is specifically designed for the safe and convenient transport of multiple advanced tech-infused medical devices. Its shock-proof material protects sensitive equipment from impacts during travel, while the dust-proof and semi-waterproof features ensure that the devices remain uncontaminated and functional in various environments. The anti-scratch interior prevents damage to the devices, preserving their integrity and performance. This case is ideal for healthcare professionals, emergency responders, and medical teams who require quick access to essential technology in diverse settings, including hospitals, clinics, and remote locations, facilitating timely and effective patient care.
Serves as a convenient attachment point for easy access and portability. It allows users to securely clip the medical kit to backpacks, belts, or other gear, ensuring it is readily available in emergencies. The carabiner facilitates quick detachment when the kit is needed, while also keeping it safely stowed during transport. This feature enhances the kit's accessibility and ensures that it can be carried hands-free, making it ideal for outdoor activities, travel, or any situation where immediate access to medical supplies is essential.
Is a timekeeping device that can be easily accessed during patient assessments. It is particularly useful for measuring pulse and respiratory rates.
a). Preparation: Ensure the lapel watch is functioning properly and set to the correct time. Familiarize yourself with the watch's features, such as the second hand, which is essential for timing.
b). Patient Positioning: Have the patient sit or lie comfortably, ensuring they are relaxed. This helps in obtaining accurate pulse and respiratory rate measurements.
c). Measuring Pulse Rate:
- Locate the Pulse: Use your fingers (usually the index and middle fingers) to locate the radial pulse on the wrist or the carotid pulse on the neck.
- Start Timing: As soon as you feel the pulse, start the second hand of the watch (or note the time if it does not have a second hand).
- Count Beats: Count the number of beats for 30 seconds. Multiply this number by 2 to calculate the beats per minute (BPM). Alternatively, you can count for a full minute for more accuracy.
- Document Findings: Record the pulse rate in the patient’s medical record, noting any irregularities or abnormalities.
d). Measuring Respiratory Rate:
- Observe Breathing: While keeping the watch in hand, observe the patient’s chest rise and fall without drawing attention to the measurement (to avoid altering their breathing pattern).
- Start Timing: Begin timing as you observe the first breath.
- Count Breaths: Count the number of breaths for 30 seconds and multiply by 2 to get the breaths per minute. Alternatively, count for a full minute for accuracy.
- Document Findings: Record the respiratory rate in the patient’s medical record, noting any irregularities.
e). Patient Care: Discuss the findings with the patient, explaining any necessary follow-up actions based on the pulse and respiratory rates, especially if they are outside the normal range.
A medical device used to measure blood glucose levels. It is essential for individuals with diabetes to monitor their blood sugar to manage their condition effectively.
a). Gather Supplies: Collect the glucometer, test strips, lancing device, and lancets. Wash your hands.
b). Prepare Lancing Device: Insert a lancet into the lancing device and adjust the depth setting if needed.
c). Prepare Test Strip: Take a test strip from the container and insert it into the glucometer, which should turn on automatically.
d). Obtain Blood Sample: Use the lancing device to prick the side of your fingertip and obtain a small drop of blood.
e). Apply Blood Sample: Touch the blood drop to the test strip, ensuring it fills the channel completely.
f). Read Result: Wait for the glucometer to display your blood glucose level and record the result.
g). Dispose of Materials: Safely dispose of the used test strip and lancet in a sharps container.
h). Follow Up: If the reading is outside the target range, follow your healthcare provider's recommendations for management.
A card that literally Gets you "synced up to your Medpod"